LCD backlight failure is most common cause that gadget ends up its useful life on a scrap yard.
In reality, this problem can be easily fixed by replacing faulty CCFL lamp or (and that is much more interesting) by making new light source using modern super bright LEDs.
 |
| DIY LCD backlight repair. |
Technique described below can be applied to repair or modify any kind of LCD.
***
My today's patient is "no name" digital picture frame with 7" LCD.
It was pretty easy to take it apart.
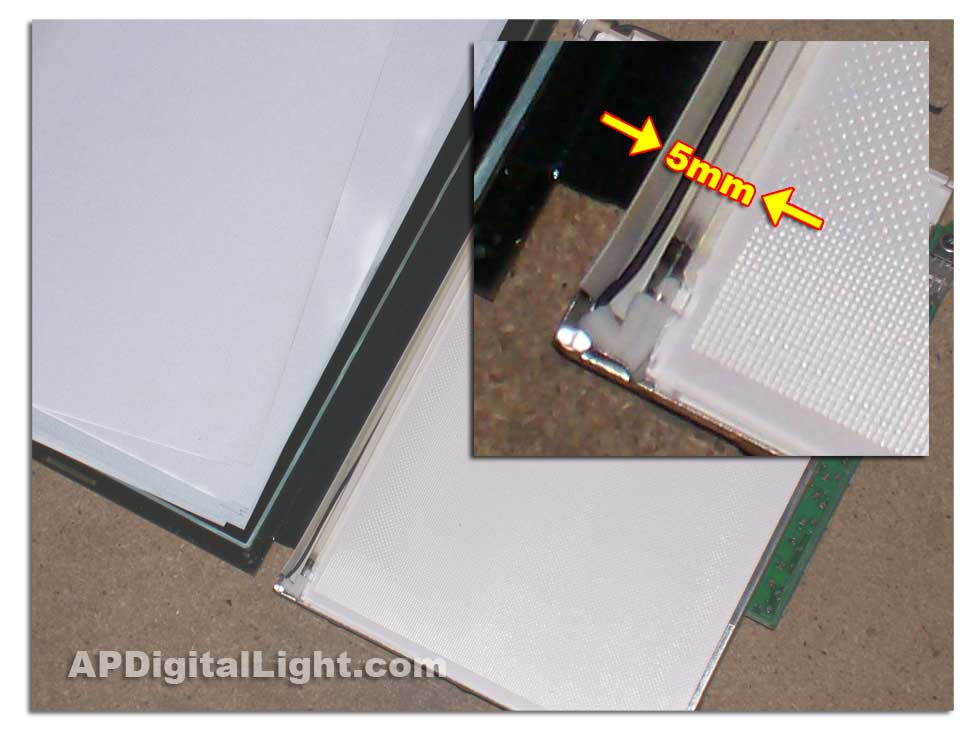 |
| LCD open. Note burnt CCFL lamp. |
As expected, there's not enough room to embed bulky LED assembly - CCFL lamp slot is about 5mm wide, so using SMD LEDs was the obvious choice.
Usually this kind of light emitting stuff is widely available on eBay.
For this mod I used 1210 ultra bright white LEDs from "Advanced Electronics" with following parameters
- forward voltage drop 3 - 3.2V;
- forward current 20 mA;
- luminous intensity 2500 - 3000 MCD.
Assume that power supply is 12V then we can connect 3 LEDs in series and add current limiting resistor to maintain 20mA current in circuit.
Resistor value (KOhm) = (Vsupply - 3 * Vfvd ) / I = (12 - 3 * 3) / 20 = 0.15 KOhm.
That's our basic LED circuit.
Next, we need to connect few circuits in parallel to achieve bright and even illumination over entire area of the display.
For this particular mod I used 5 circuits with 15 LEDs in total. Whole LED assembly consumes about 100 mA.
 |
| New LED light source. |
***
Dimensions of board is 4 mm by 152 mm and it perfectly fits into lamp slot.
PCB itself is very simple. Basically it consists of few parallel lines so I cut tracks with scoring tool and tinned it with soldering iron.
There are two tracks on back side of board for 12V supply and ground return.
LEDs are evenly spaced along the lengths of strip. Distance between LEDs is 10 mm.
 |
| LED strip. |
 |
| LED strip is mounted into LCD. |
***
After I've mounted LED strip and assembled LCD, I realized that this device is powered by 9V.
That's definitely not enough to fire up 3 LEDs connected in series.
:-(((
Well, in order to boost input voltage I have to build DC converter and it should be tiny enough to fit into very limited space inside case.
It's time to dive into junk box then...
Fortunately I had few obsolete cell phone car chargers laying around.
Most of car power supplies is based on MC34063 chip.
Using this versatile switching regulator we can build adjustable step-up, step-down or voltage inverting converter with output current up to 1.5A. See application note for design examples.
If you don't have time to study data sheet, there's online tool for quick calculation of MC34063 converter's parameters.
***
I took apart one car charger and reused caps, diode, inductor and chip itself, replacing only couple resistors in order to achieve 12V output.
 |
| MC34063 based 9V to 12V converter. |
New 9V to 12V DC converter is assembled on a perfboard with dimensions 18 x 25 mm and I've managed to fit it into empty corner between motherboard and case.
 |
| 9V to 12V converter is mounted inside case. |
Well, job is almost done, unit shown below is without face cover.
It was real fun to work and new LED backlight should last for the next 50000 hrs.
 |
| New LCD backlight. |
***
No comments:
Post a Comment